From Idea to Reality: A Guide to Prototyping Your Product
Transforming an idea into a reality is a journey – prototyping serves as the compass. At times, we have to learn this the hard way.
Take me, for example, on the first 3D-printing project I led in college. We were a team of 7 that designed a prosthetic arm for a 16-year-old boy, Luke, learning to drive a car. We were full of confirmation bias and we were sure our arm would work the way we had tested it.
The only problem? It was the day before giving the arm to Luke and we applied an epoxy coating on the ABS plastic-printed arm for the first time. The epoxy wasn’t drying. So, we panicked, ignored the laws of physics, and fired a heat gun on the plastic arm. Needless to say, the delivery of the arm was postponed and that lesson will stick with me for life. Good prototypes are essential.
So, you have an idea, maybe you’ve drawn a picture, and now you want to develop an amazing new product. The next question is, how do you go from concept to physical product? And why should you invest time and money into prototyping in the first place?
This guide walks you through the next steps in your process, different kinds of prototypes, and how testing can turn your early design into a market-ready product.
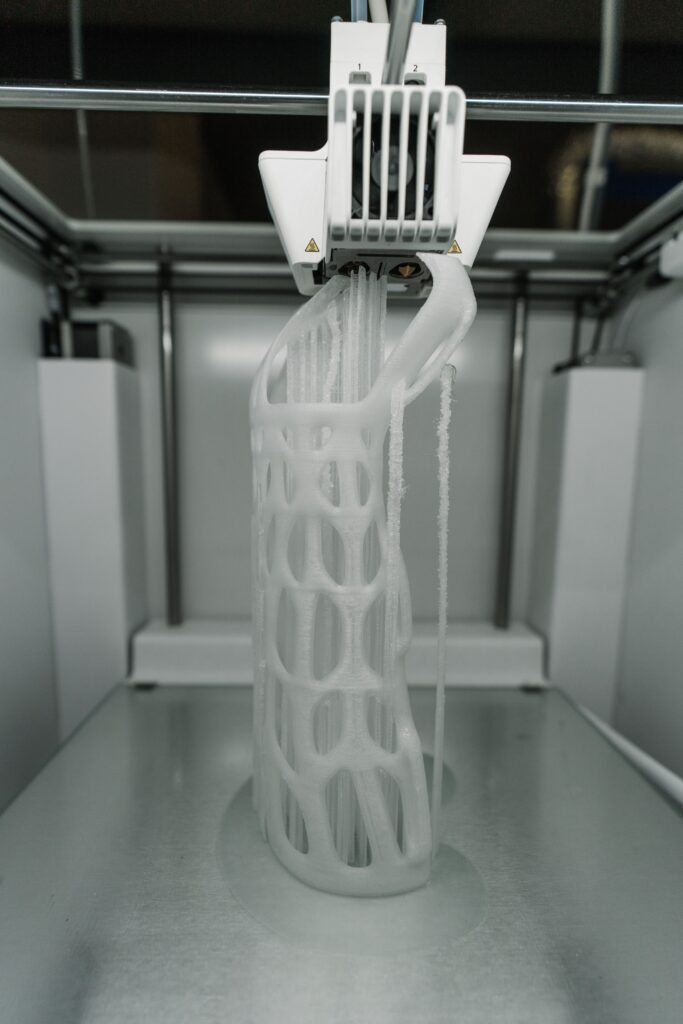
3D printed prototypes are one of the best investments to ensure reliable test results.
What is a Prototype?
To define, a prototype serves as an early model or sample version of a product for testing and development purposes. The range of prototypes can vary. They can be simple models or almost finished products.
Designers, engineers, and inventors create prototypes to test their ideas and get feedback before mass production.
There are a few key benefits of creating prototypes:
Early analysis – Test technical feasibility and functionality
Visualization – Bring ideas to life and show investors
User testing – Gain insight into customer needs and issues
Iterative design – Refine the product through multiple iterations
Cost effective – Test concepts without expensive manufacturing
Faster to market – Accelerate development and release cycles
Prototype Variations
There are several kinds of prototypes, each serving a different purpose:
Proof of concept – Simple models focused on testing one key function or technology.
Form study – Basic physical models exploring size, shape and ergonomics.
Appearance model – Highly detailed models showing the product’s finished look.
Functional prototype – Models demonstrating the product’s intended operations.
Pre-production prototype – Very close to final product for testing before mass production.
You may start with rough proof of concept models and progressively create more refined and realistic models as the design evolves. The style you choose depends on your needs at each stage of development.
How To Make A Prototype
- 3D printing – Quickly print models from digital files.
- CNC machining – Precision subtractive manufacturing using computer-controlled tools.
- Laser/water jet cutting – Cut, etch and engrave materials like wood, plastic and metal.
- CAD design – Design 2D plans and 3D models you can print or machine.
- Electronics prototyping – Test electronic circuits with prototyping boards and microcontrollers.
Developing a Functional Prototype
Creating a functional prototype involves an iterative process:
Design – Create initial 2D/3D CAD models and technical drawings.
Build – Use CNC, 3D printing, etc. to create an initial prototype.
Test – Rigorously test functionality against requirements.
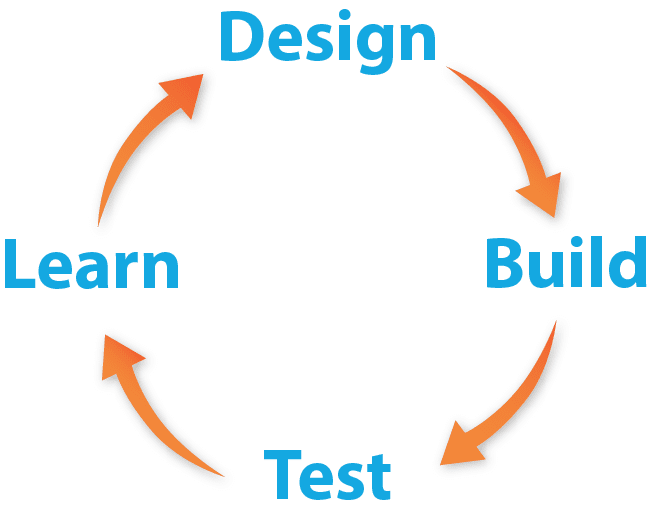
Foundation of the Engineering Design Cycle
Learn and Refine – Modify design to address issues observed during testing.
Repeat – Build, test and refine through multiple iterations.
Tips for an Effective Prototype
Here are some tips for developing a high-quality functional prototype:
- Prioritize critical features over aesthetics
- Use affordable materials (doesn’t need to be production-grade)
- Design for manufacturability/assembly from the start
- Over-engineer moving parts for durability during testing
- Instrument the prototype to capture sensor data
- Add quick-access panels to easily service internals
- Focus refinement on high-risk areas and pain points
- Document issues clearly, including steps to reproduce
- Keep regenerating until the product performs flawlessly
Validating Your Design with Users
- Focus groups – Get feedback from a small group of users. Observe how they interact with the prototype.
- Surveys – Collect input from a large sample size through online surveys.
- In-context testing – Test with users in the environment it will be used.
- Pilot studies – Deploy to a limited market for real-world testing.
Testing reveals how actual users experience the product. Watch for pain points as users interact with your prototype. Collect feedback on what they like, what’s confusing, and desired improvements.
Then refine the design based on testing data. By iteratively prototyping and testing with users, you can create a product that truly meets their needs and provides a great user experience.

How do you plan to talk to your audience? Showing them your physical prototype is an outstanding catalyst for customer conversations and can help secure licensing deals.
Transitioning to Production
- Simplify the design and reduce part count where possible
- Standardize components to leverage economies of scale
- Select materials that are easy to source and process
- Design parts for efficient manufacturability
- Develop quality control tests and protocols
- Create technical specs, BOMs, operational manuals